Network setup
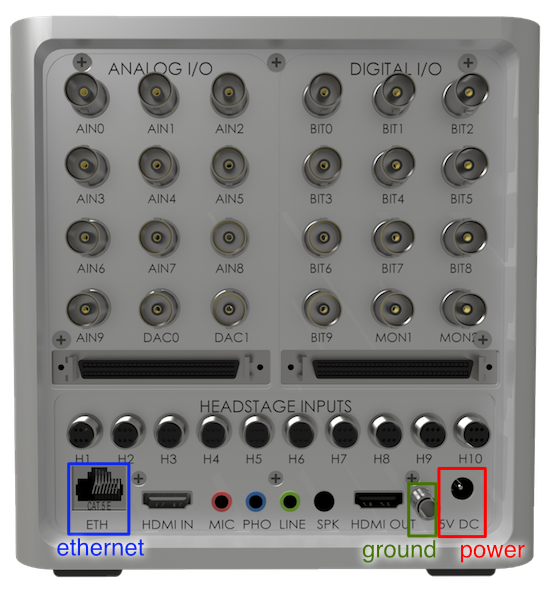
The eCube server device connects to a host computer via gigabit ethernet. In order to maximize data integrity and connection stability, we highly recommend directly connecting the eCube to a host system via a dedicated network interface, or dedicated internal LAN with 1Gbps (line-rate) forwarding.
The following steps detail the process of setting up the host computer for direct eCube connection using host DHCP.
Network interface driver setup
-
Make sure that the host computer has 2 gigabit network interfaces. For a workstation PC, these are usually
- dedicated ethernet interface on the motherboard
- with one or more additional:
- gigabit interface PCI express (PCIe) cards
- USB 3.0+ gigabit ethernet adapters
If one of your ethernet devices is a USB ethernet adapter, we recommend that the motherboard adapter, or a PCIe network adapter, be connected directly to the eCube. -
Install the latest drivers for your network interfaces. In particular, if you run Windows 10 and have a built-in Intel network controller on the motherboard, please download and install Intel Network Adapter Driver for Windows 10 .
eCube network controller options
-
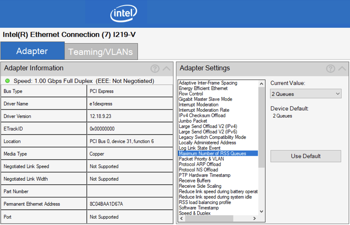
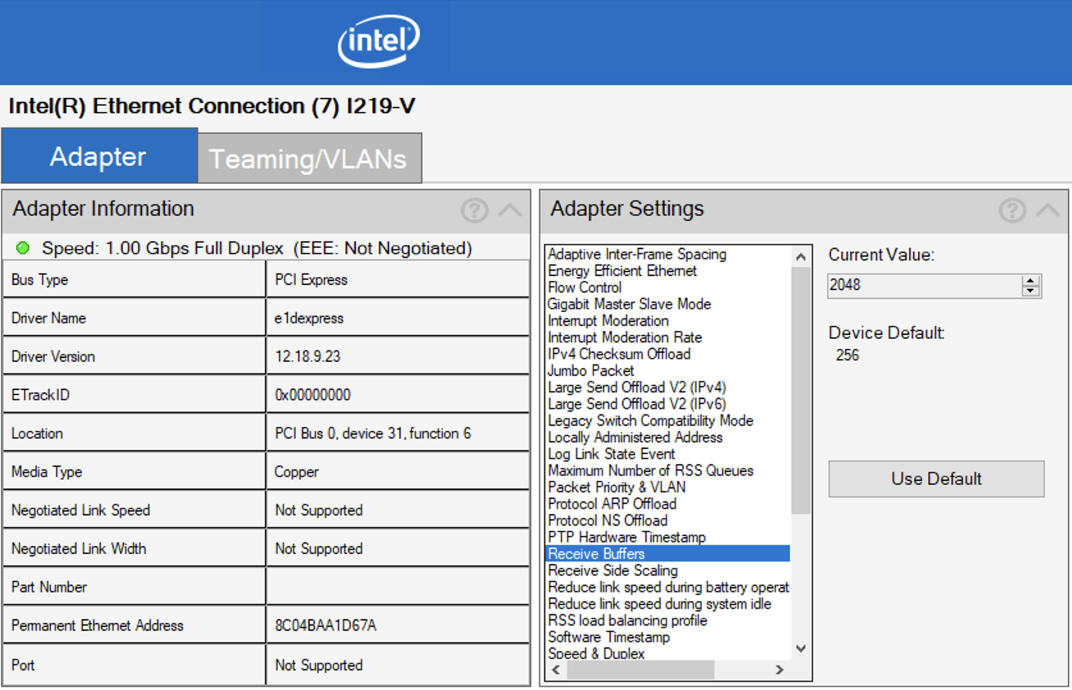
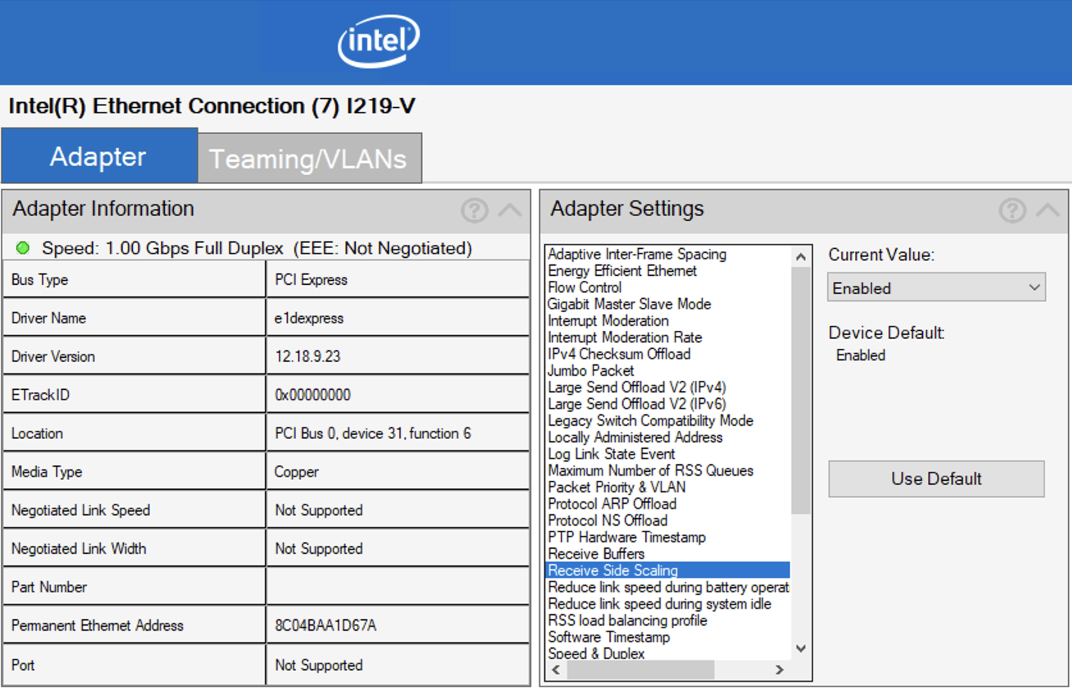
Make sure the below controller settings are applied for the eCube-connected network controller. The screenshots below apply to a motherboard built-in Intel network controller, using the PROSet Utility to configure the interface options.
-
Launch
Start Menu>PROSet, and select the appropriate network controller (e.g., Intel I219):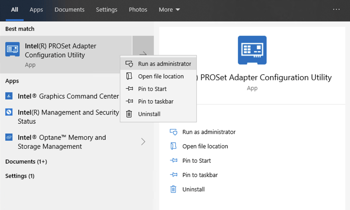
-
Make sure the following options are set:
Receive Buffers:2048(should be maximum)Receive Side Scaling:EnabledMaximum Number of RSS Queues:2(should be Device Default)


-
Connect the eCube directly to this built-in gigabit network interface.


Additional network controller options
-
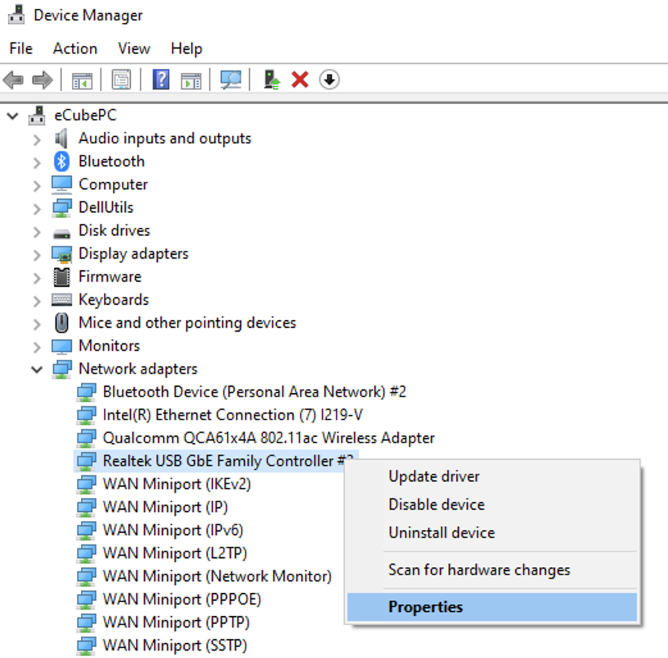
We recommend that the below settings are applied for additional network interfaces, such as the interface connected to your organizational or campus network. The screenshots below apply to a USB 3.0 gigabit ethernet adapter, using driver settings in Device Manager.
-
Launch
Start Menu>Device Manager, and select the appropriate network controller (e.g., Realtek USB GbE):
-
Navigate to the “Advanced” tab, where we suggest setting the following option:
Jumbo Frame:9KB MTU(may also display as9000, or another number above 9000, such as9012).

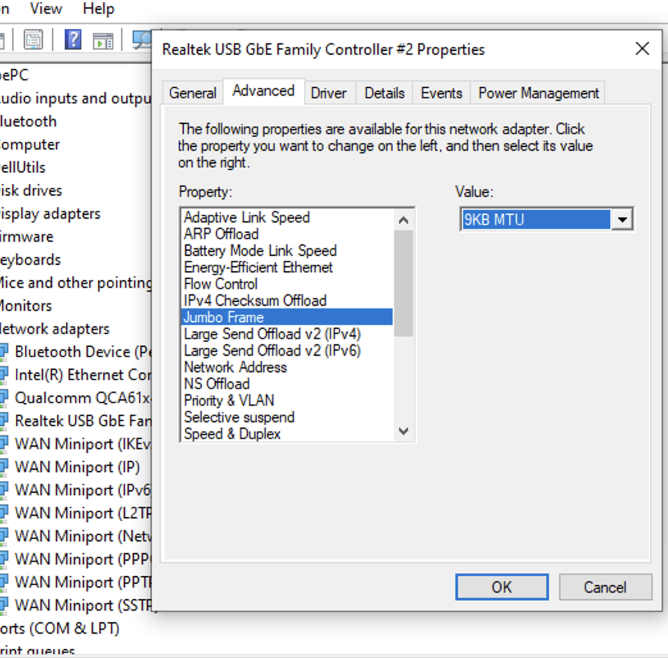
Jumbo Frame with a number such as 9KB, 9000, or above, your network adapter does not support 9000-byte jumbo frames. If you are using eCube with more than 640 channels, we highly suggest the use or additional installation of another network adapter supporting 9000-byte jumbo frames.
eCube ↔ operating system networking setup
Windows
-
Make sure that the host computer has 2 gigabit network interfaces. For a workstation PC, this is usually a dedicated ethernet interface on the motherboard, along with a gigabit interface PCI express card or a USB 3.0+ gigabit ethernet adapter.
- If one of your ethernet devices is a USB ethernet adapter, we recommend that you connect the USB ethernet adapter to your organizational or campus network, and this will serve as your Uplink connection. We recommend that you connect the remaining motherboard or PCIe network adapter to the eCube; this will be your eCube connection.
-
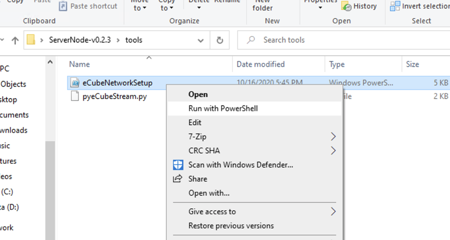
Inside the unpacked
ServerNodesoftware package, under thetools/folder please find a Windows Powershell script namedeCubeNetworkSetup.ps1. -
Use the mouse to right click -> “Run with Powershell”. This will open a Powershell script, and if necessary, ask to escalate to Administrator privilege to set system network settings.
-
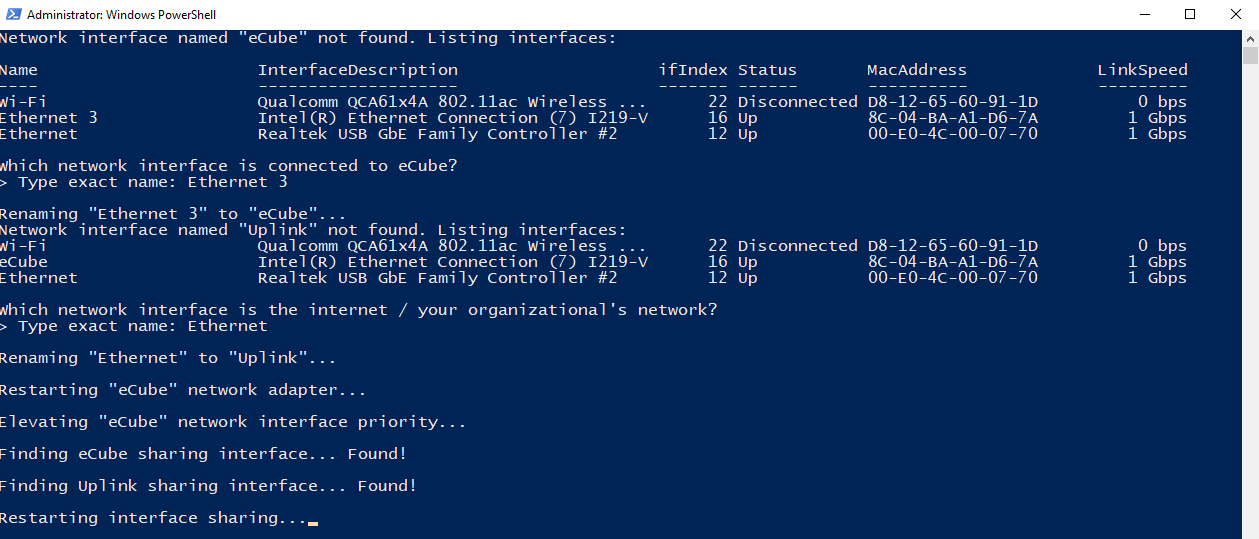
If this is the first time you have configured your eCube hosting computer, you will be prompted to designate your Uplink and eCube interfaces. If you have previously designated these interfaces before, you will not see this step.
-
First, you will be prompted to type the exact name of the eCube-connected interface. In this example, the eCube was plugged into
Ethernet 3.
Type the interface name:
Ethernet 3If you are not sure which interface is connected to the eCube from the names alone, try turning off the eCube, and press
Enteron the keyboard. All network interfaces will be re-listed. Look for an interface whoseStatuscolumn changes fromUptoDisconnected. -
Next, you will be prompted to type the name of the Uplink interface, which is the network that is actively connected to campus or organizational internet. In this example, the Uplink connection was named
Ethernet.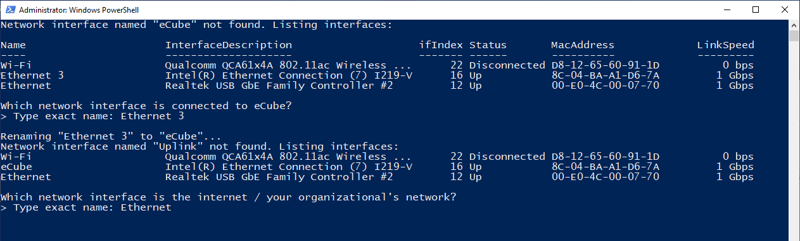
Type the interface name:
Ethernet
-
-
Automated DHCP setup will occur using the Windows OS feature of “internet connection sharing”.
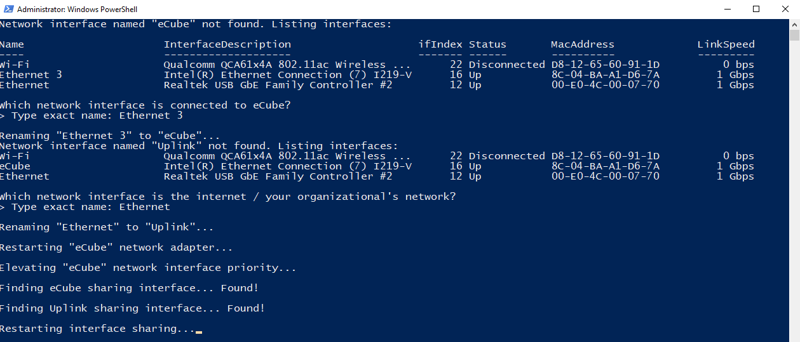
Interface sharing and rearrangement of network interface metric will occur automatically.
-
The Powershell window will close. Power-cycle the eCube by turning it off and back on, and you can follow the rest of the Quickstart guide, operation section.


Windows: Schedule network setup on reboot
If you are using Windows 10, network connection sharing settings may be reset on rebooting of the system, especially for setups involving USB-ethernet devices. As a result, after the above network setup steps are complete, it is often desirable to re-run the fully-automated sections of eCubeNetworkSetup on reboot.
Follow these steps to run eCubeNetworkSetup automatically on reboot without user intervention:
-
Obtain
eCubeNetworkSetup.ps1and place it in a known fixed location. In this example, it is located on the Desktop, at the pathC:\Users\eCubePC\Desktop\eCubeNetworkSetup.ps1.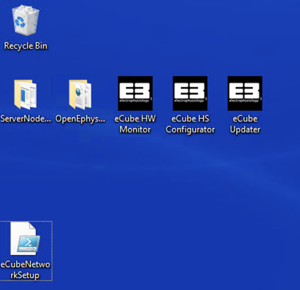
-
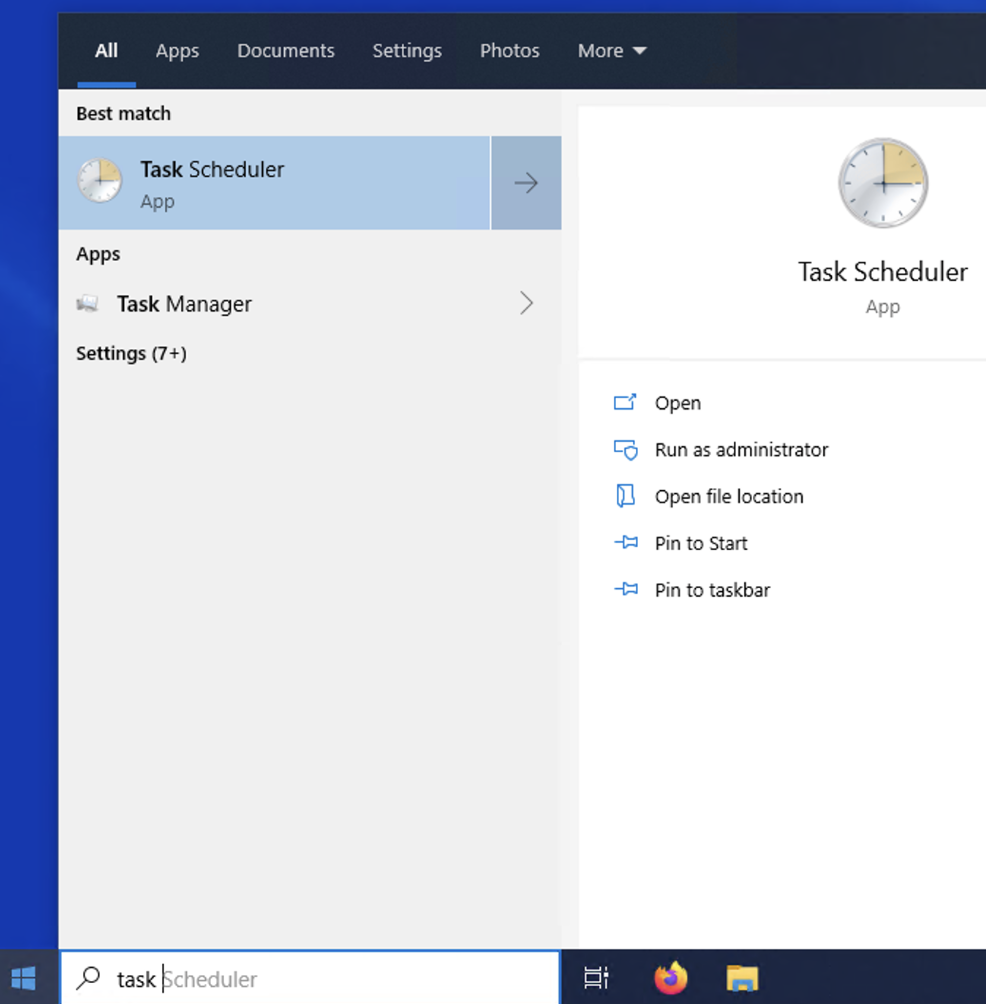
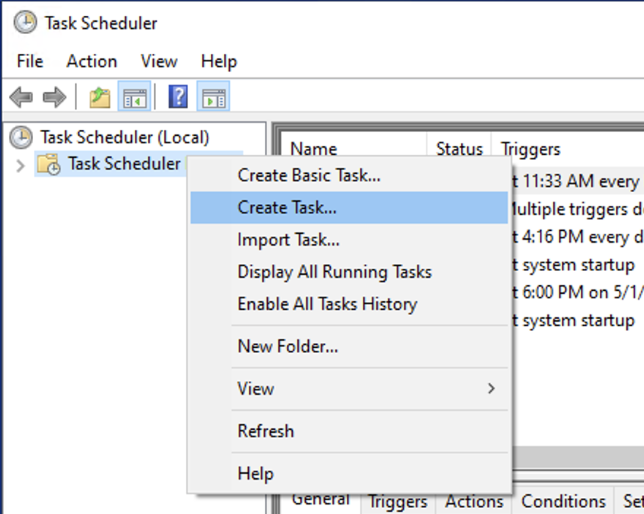
Locate and launch the Windows Task Scheduler by clicking the Start button and typing “Task Scheduler”.

-
Under the left panel
Task Scheduler (Local)->Task Scheduler, right-click and selectCreate Task...
-
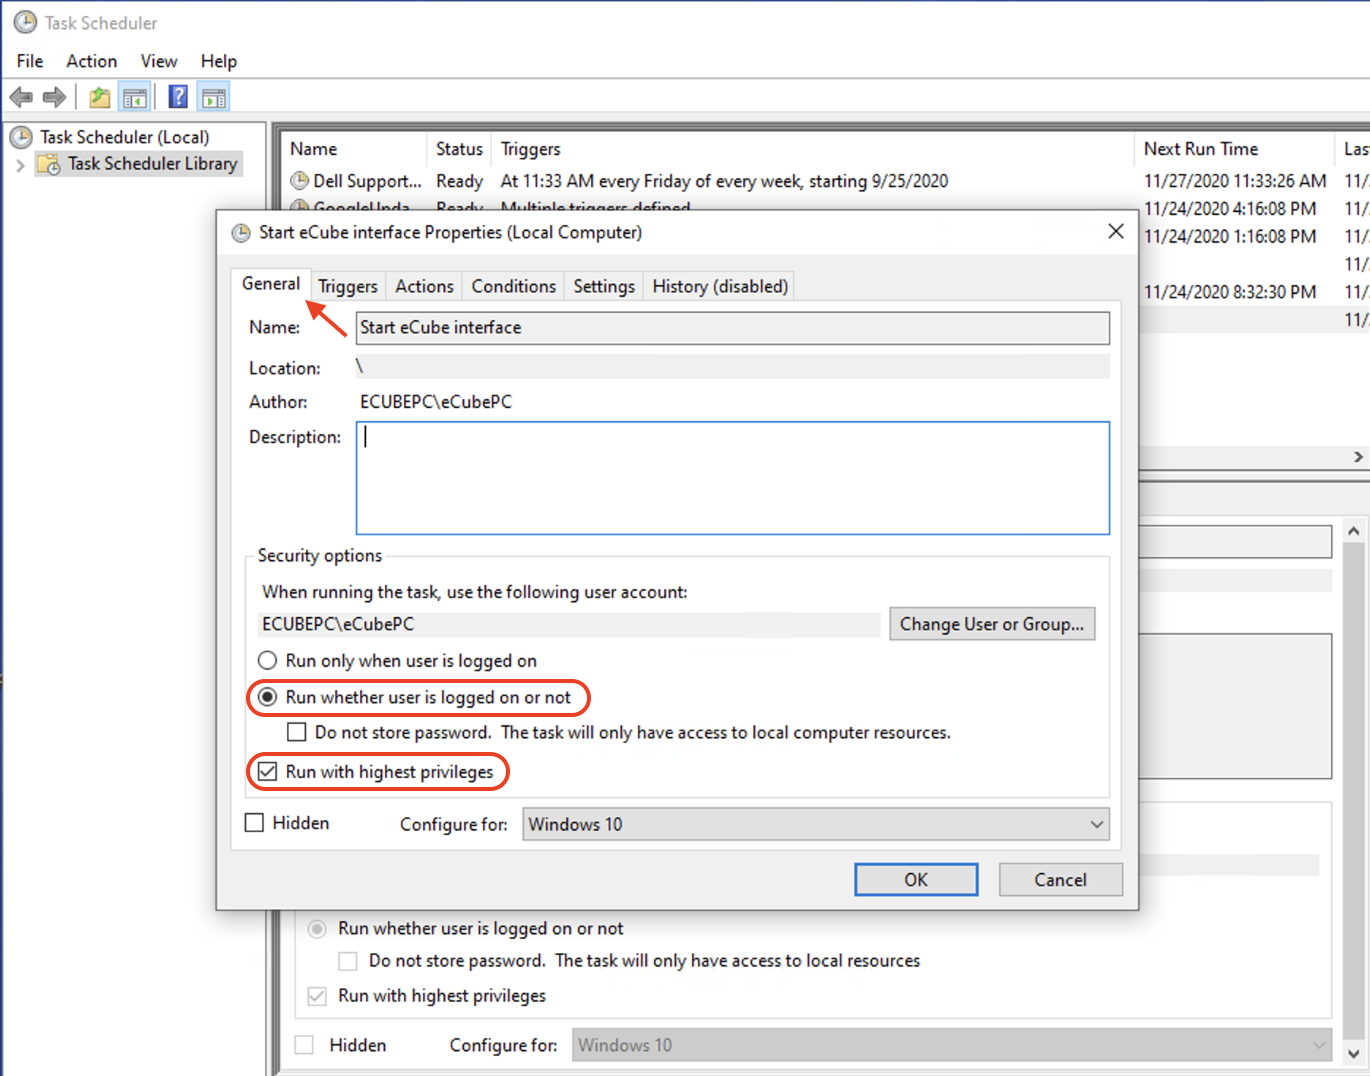
Give the new task a descriptive name, such as
Start eCube interface. In theGeneraltab, select theRun whether user is logged or notoption, and checkRun with highest privileges.
-
In the next
Triggerstab, set the task to beginAt startup, with a30 secondsdelay. Make sure the trigger isEnabled.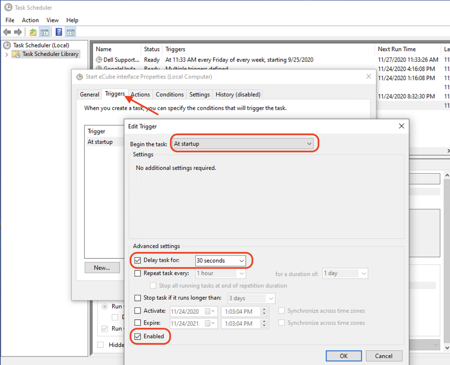
-
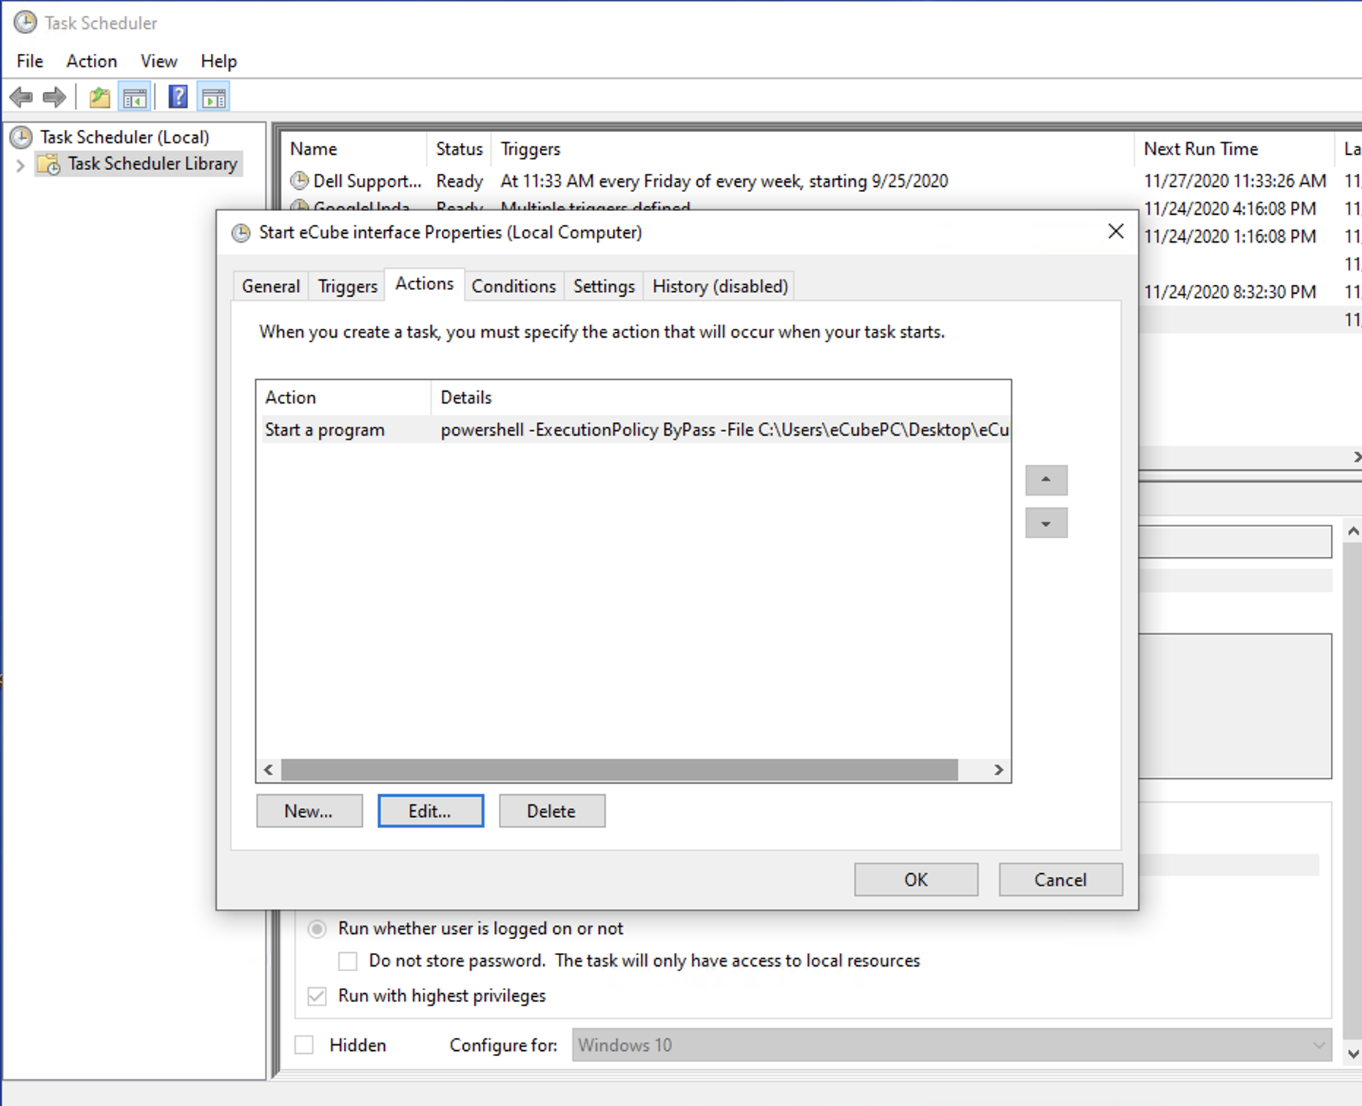
In the
Actionstab add aNew...action, set the performed action toStart a program, the program namepowershell, and fill the Arguments box with the arguments:-ExecutionPolicy ByPass -File "C:\[path\to\your\own]\eCubeNetworkSetup.ps1"Replace [path\to\your\own] with where your copy of eCubeNetworkSetup.ps1 is located. In this example, the Arguments box is filled with the string
-ExecutionPolicy ByPass -File "C:\Users\eCubePC\Desktop\eCubeNetworkSetup.ps1"Note that quotation marks
" "around the path is required if you have folder or file names with spaces.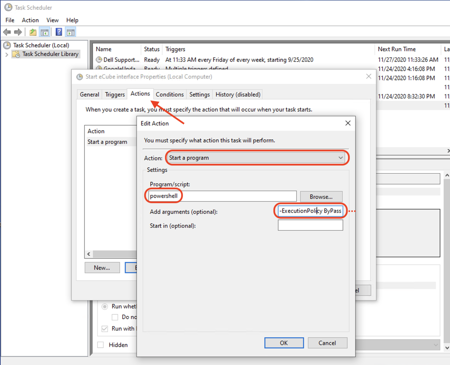
After completing and clicking
Ok, the Action should look like this: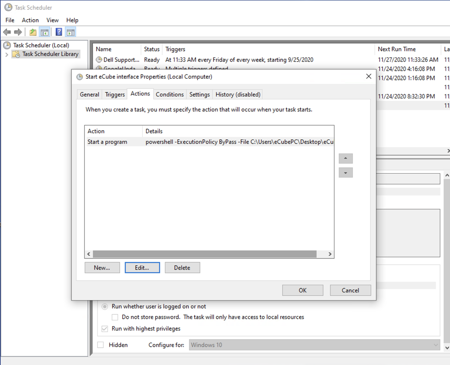
-
In the
Settingstab, set theStop the task if it runs longer thanoption as shown below:
-
Press
Okand if prompted, enter the Administrator password to schedule the task.


The eCubeNetworkSetup.ps1 script will now be run at system startup for your Windows 10 PC.
Linux (Ubuntu)
These instructions can be used under a Desktop install Ubuntu 18.04 (Bionic) or 20.04 (Focal), which uses network-manager by default to manage the systemd network overlay. Note that "Server" installations of Ubuntu needs to be configured instead through netplan.
-
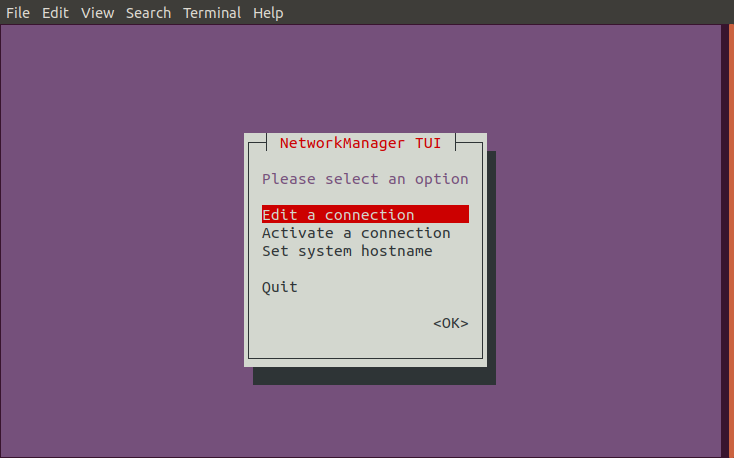
Open a terminal and launch the ncurses-based network connection manager,
nmtui(this was tested to be much less buggy than the GUI-based configurator in Settings, which didn’t apply these settings properly, especially under Ubuntu 18.04)
-
Use arrow keys ↑↓←→ to select “Edit a connection” and press Enter.

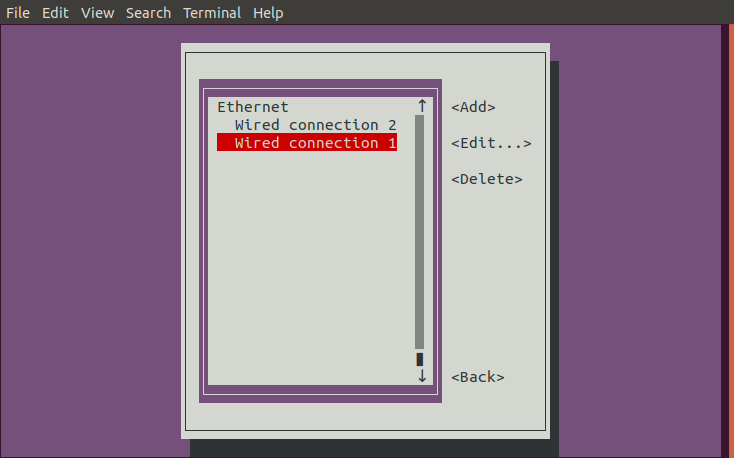
-
Select for editing the network interface connected directly to your eCube. If you are not sure interface this may be, you may have to cross-check with the device name listed in the next step, and use Esc key to come back. (Do not edit your host system’s upstream internet connection or Wifi hotspot connection. If selected accidentally, return using the Esc key.)
If you have multiple unknown interfaces, you may have to check with the Ubuntu network GUI or the
ip linkcommand to see which interface becomes active and inactive when you turn on a directly connected eCube.
-
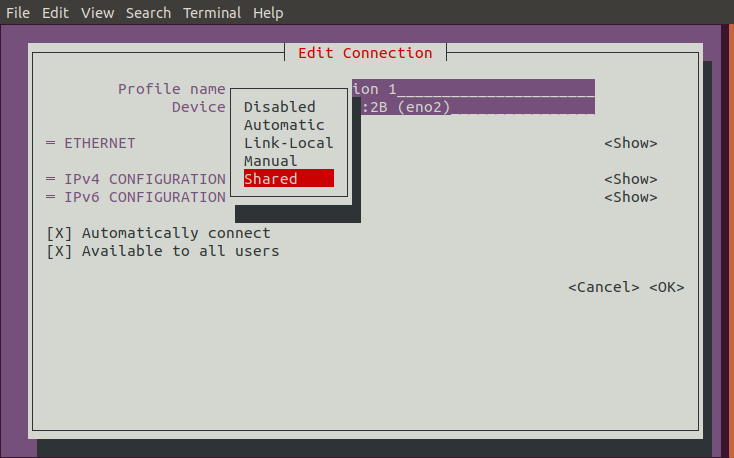
When you’ve successfully chosen the network interface direct connected to your eCube, Use arrow keys ↑↓←→ to select the mode selector after
IPv4 CONFIGURATION<Mode>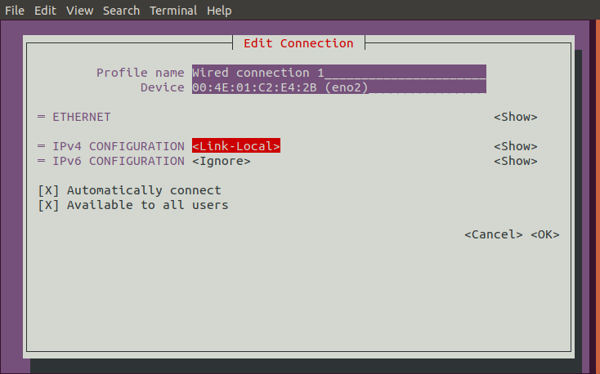
-
Change the mode to
<Shared>from the previous state (which was likely to have been<Automatic>or<Link-Local>)
-
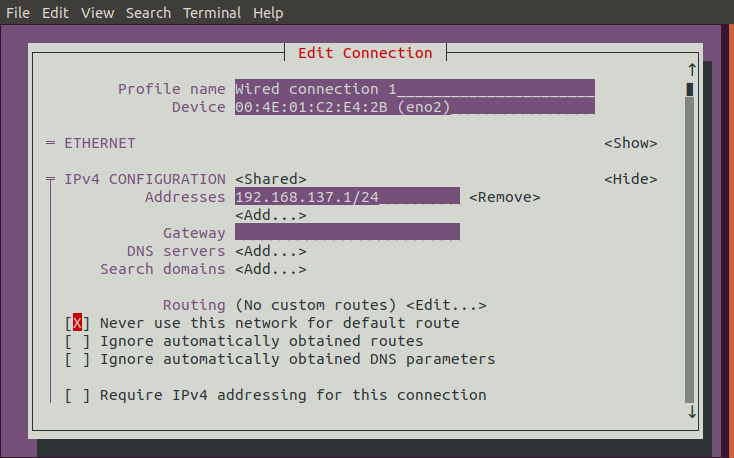
Expand the
<Show>option afterIPv4 CONFIGURATION -
Go to the
<Add...>option after Addresses -
In the
Addresses->Add...box, enter a desired LAN (local-routing only) IP address block, which should be something in192.168.x.x,10.x.x.x, or172.16./12. More detailed examples below: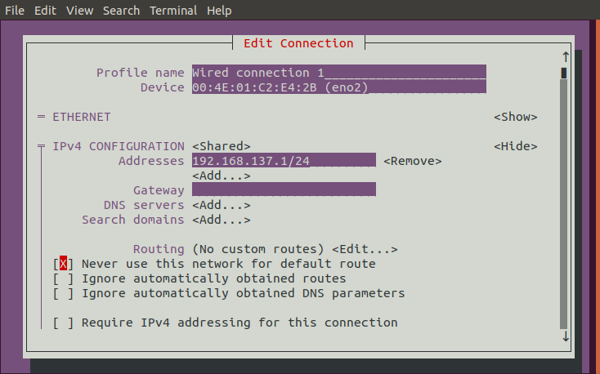
In this example we're using 192.168.137.1/24
-
Move down and check the checkbox next to
Never use this network for default routeusing [Spacebar].
Remember to exclude this directly connected, link-scope hop from the default route by checking the checkbox.
-
Arrow key to scroll down to the bottom and press [Enter] on
<OK>. -
Turn on or power-cycle the eCube. Wait about 30 seconds for it to obtain a network address assignment from the host system.
-
You should be able to find the assigned network address by checking active DHCP leases by checking the system file
/var/lib/misc/dnsmasq.leases$ cat /var/lib/misc/dnsmasq.leases 1627605006 70:b3:d5:36:80:0b 192.168.137.227 ecube-C83C *In this example, the eCube serial number
C83Chas taken the IP address192.168.137.227, which can be connected using theservernodeapplication:$ servernode 192.168.137.227