Updating
Updating software and firmware for your eCube and ServerNode setup.

Plug the supplied AC-to-5VDC adapter of the eCube into a wall socket and connect it to the marked 5V DC barrel jack.
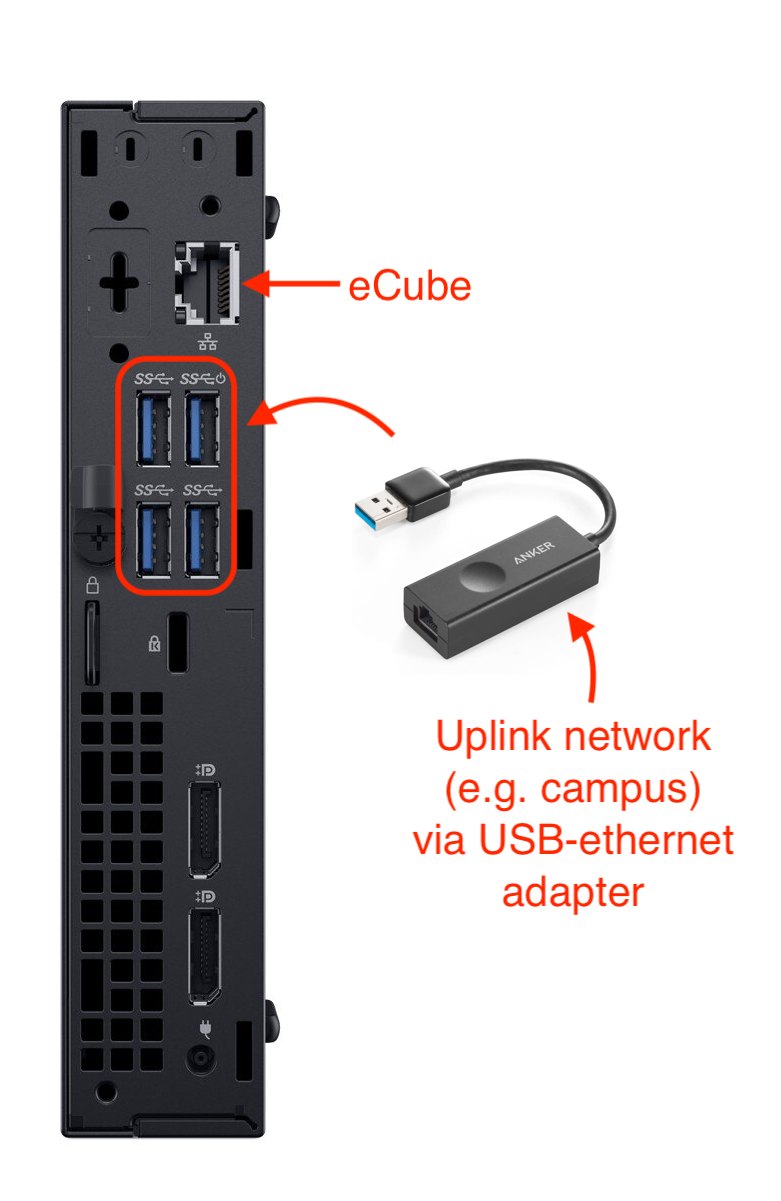
Use any Ethernet cable (Cat 5e or higher) to connect the eCube ETH port to an available Ethernet port on a PC motherboard, or PCI-express ethernet card.
Note: We do not recommend using the eCube ethernet connection with a USB-ethernet adapter, especially if running 512+ channels. If you have a limited number of ethernet ports, additional gigabit USB-ethernet adapters (USB 3.0+) can be used instead for the Uplink (campus / organizational) internet.
If you are using one of our supplied recording PCs, please following the below diagram for connecting the eCube and organizational internet.
Turn on the PC and eCube. A blue ring around the power button should be lit on the eCube, and an orange light should be lit behind the eCube ethernet connector.
Connect headstage tethers to headstage ports, marked H1 through H10, and screw down the tether locking screw.
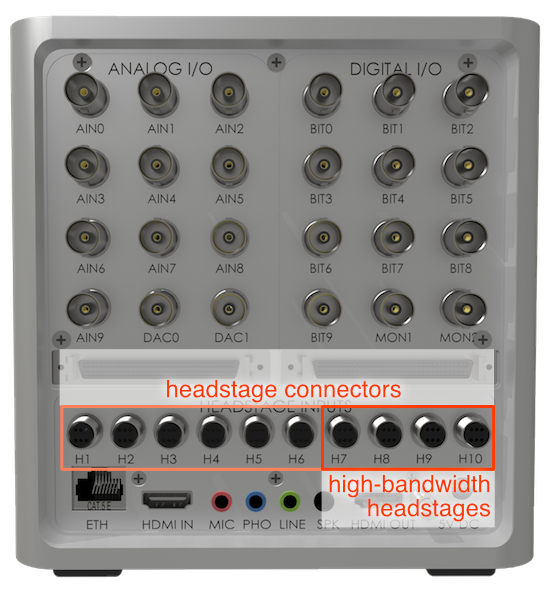
Connect high-bandwidth headstages with 128+ channels, such as HS-640 stacking headstages, to headstage ports H7 through H10.
Connect lower-throughput headstages with 64 total channels, such as classic HS-64 headstages, to any available headstage port, H1 through H10.
Connect headstages to electrodes or electrode interface boards (EIBs).
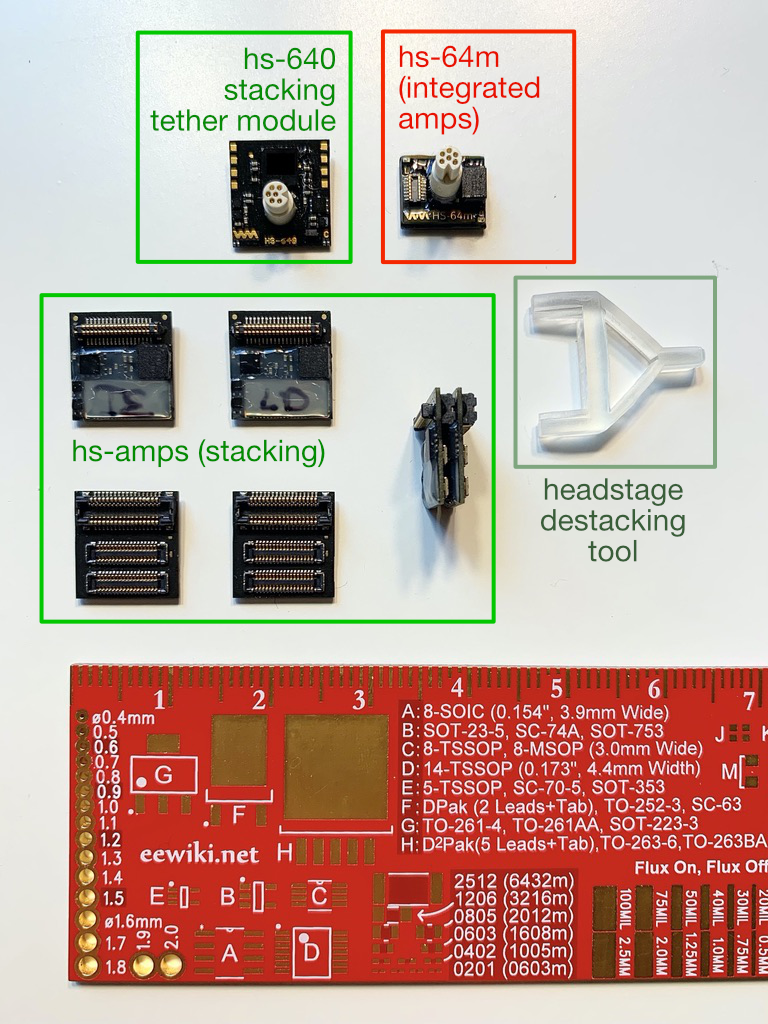
If you have a stacking headstage, such as HS-640, please connect individual hs-amp amplifiers to desired electrodes first, prior to stacking up the headstage.
Verify that the mating of the electrode connectors are correct, and apply gentle but firm pressure. A soft click should be felt while joining the connectors.
Please see the Hardware section for more detailed instructions about headstage assembly.
Assemble stacking headstages (if applicable, for stacking headstages only such as the HS-640) by using the the digital stacking connectors to stack headstages in a vertical column.
Assemble the headstage such that the headstage amplifiers and tether module form a single 1cm x 1cm rectangular column, with the tether module on top.
If you wish to undo the headstage stacking, please use the supplied destacking tool.
Please see the Hardware section for more detailed instructions about headstage assembly.
Connect the headstage tether to the headstage. If your headstage has tracking LEDs, they should become lit at this time.
Connect other behavioral instrumentation and digital epoch code generating signals to Analog and Digital I/O panel BNCs. For more usage instructions, see more detailed eCube Server usage documentation.
If you are using one of our supplied recording PCs, the software installation has been pre-loaded. To update your software and eCube firmware, please see our Updating guide.
If you are setting up your own PC or own operating system distribution, please download and install the following products from the White Matter product website:
Download and install the Microsoft Visual C++ Redistributable, if setting up a Windows PC for ServerNode use for the first time. This official Windows library is linked on the product site for convenience, but can also be found on this Microsoft support page under “Visual Studio 2015, 2017 and 2019”, x64 section.
Download and unzip the White Matter ServerNode (Windows 64-bit), and OpenEphys (with ServerNode plugin) software (Windows 64-bit).
Download and unzip the White Matter eCube management tools.
Note that our ServerNode and associated software are self-contained, and can be run directly with no additional installation or alteration of your Windows system libraries.
Follow these steps only if you are setting up your own Windows 10 PC for use with eCube. If you are upgrading from a previous Windows 7-based legacy ServerNode, you may skip this network setup, and proceed with using your previous working eCube network configuration, including the ecube-xxxx.mshome.net hostname.
If you are using one of our supplied recording PCs, the network has been pre-set for you. To update your software and eCube firmware, please see our Updating guide.
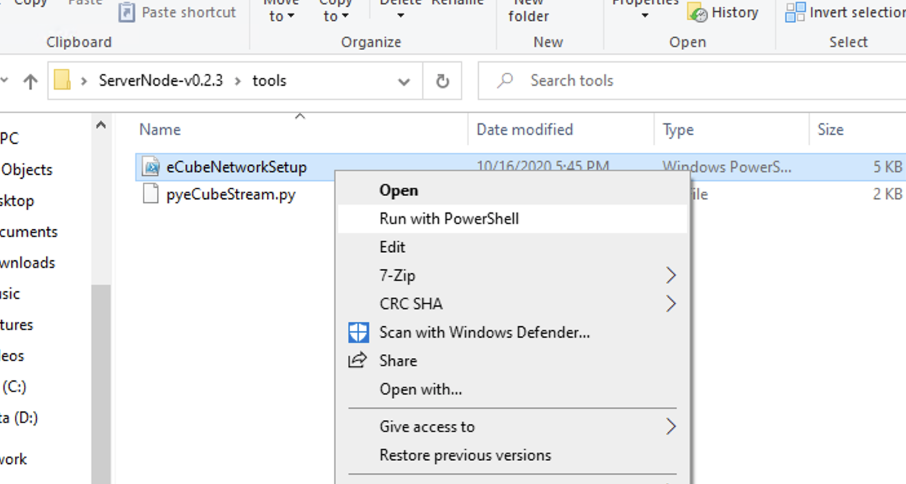
Inside the unpacked ServerNode package under the tools/ folder please find a Windows Powershell script named eCubeNetworkSetup.ps1.
Use the mouse to right click -> Run with Powershell, and follow the prompted messages to complete setting up your system network interface for direct eCube access. For detailed setup instructions, see Network setup.
In Windows 10, some network settings are reset at bootup. In order for the system to re-enable direct eCube access, it is often convenient to re-run this setup script at startup using the Windows 10 Task Scheduler. See Network setup for more details.
ServerNode requires an expanded kernel packet receive buffer for high-bandwidth data receive operation. This may be anywhere between 100MiB (1048576) - 1GiB (1073741824) depending on subscribed channel count. This can be done by setting the net.core.rmem_max parameter for the Linux kernel.
Example:
$ sudo sysctl -w net.core.rmem_max=1073741824
for this to persist through reboot, insert the following line in your /etc/sysctl.conf (for Debian/Ubuntu), or similar sysctl boot-time configuration: net.core.rmem_max=1073741824.
Run servernode.exe. A console Window will show to inform you of your connection status, recording directory, and auto-segment time. These global options can be changed at any time using commands.
List connected headstages using the list command:
> list
Available modules and channels:
 - Headstage 2 (64 channels)
 - Headstage 3 (64 channels)
 - Headstage 8 (640 channels)
 - Headstage 9 (640 channels)
 - Headstage 10 (640 channels)
 - Analog Panel (32 channels)
 - Digital Panel (64 channels)
add command. For example, to add the headstages connected in H2, then the first 512 channels of the headstages connected to H8 and H9: > add 2
> add 8 512
> add 9 512
Selected headstage channels:
- Headstage 2: 64
- Headstage 8: 512
- Headstage 9: 512
Issue the start command. Note that:
All headstages needed for future recording sessions must be added in this step. You will be able to create recordings of any subset of your added headstage channels. However, to add additional headstages, ServerNode must be first terminated.
Analog and Digital Panels does not need to be explicitly added. They are automatically added with the start command in this step.
After starting ServerNode headstage streaming, Open Ephys can be used to connect to eCube ServerNode at this time and access headstage, Analog panel, and Digital panel data.
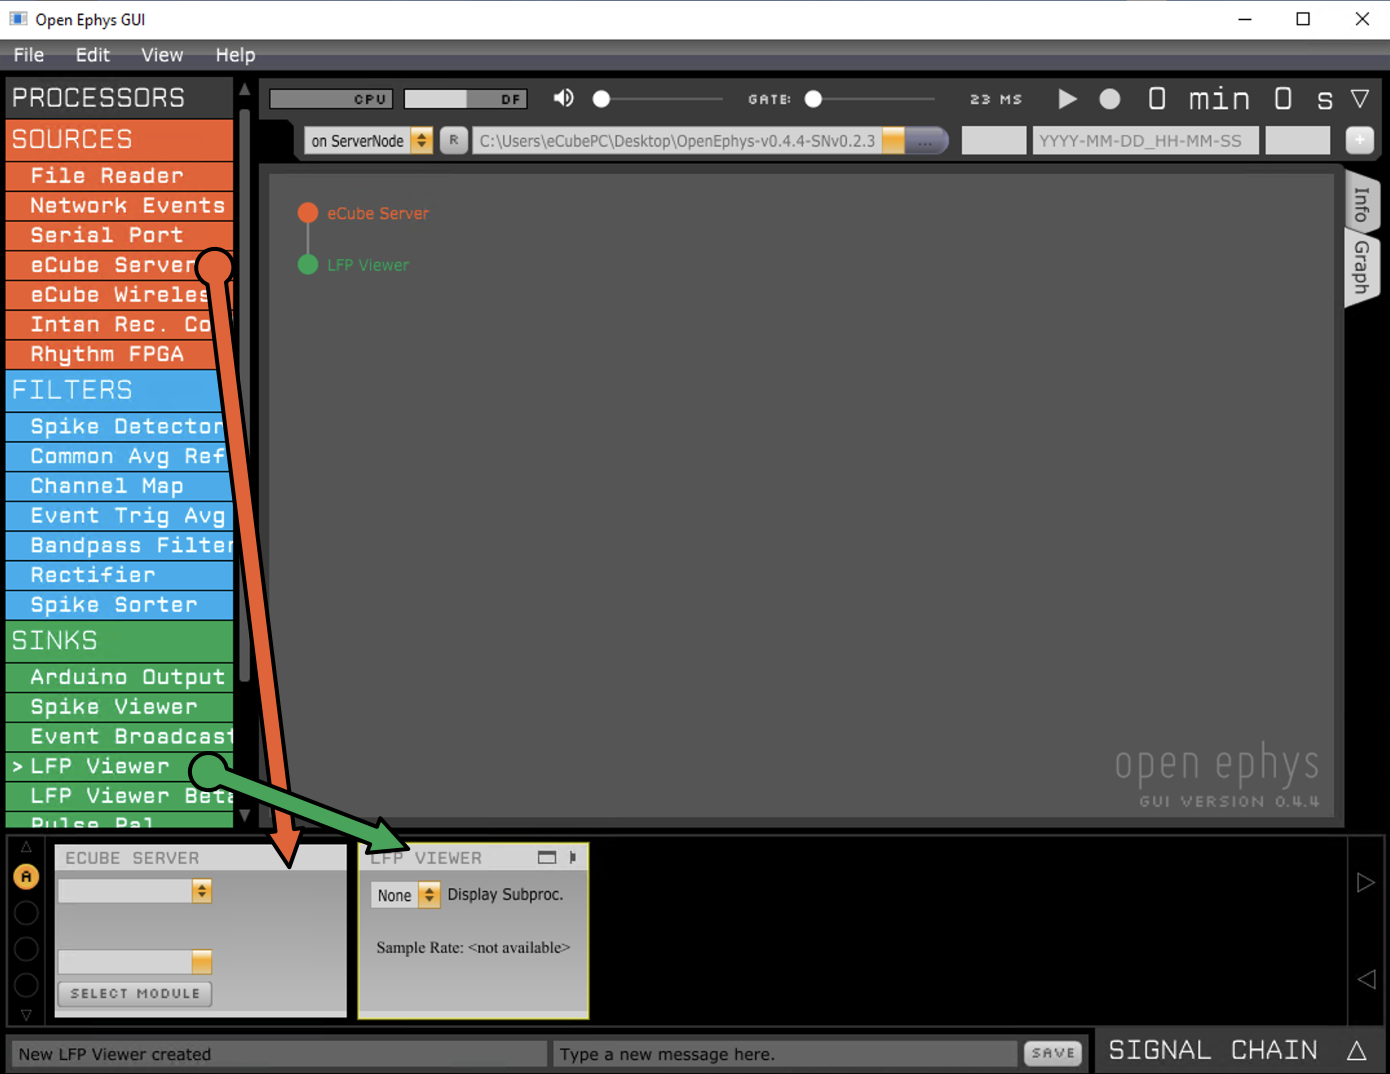
Drag a eCube Server source from the Sources bar down into the Signal chain at the bottom.
Select the desired headstages. Note that this can be any subset of the previously added headstages in the above ServerNode step.
If you want to concurrently stream and record eCube Digital panel or Analog panel sources, drag additional eCube Server sources from the Sources bar into the bottom Signal chain.
Please note that sample-aligned synchronization and ServerNode sample timestamps are only valid and relatable within concurrently created recording sessions.
For example, to record synchronized Headstage + DigitalPanel sources, add both sources into the Open Ephys window before pressing “Record”: this constitutes one session (e.g., Session A) and all data files created by this process are synchronized.
Additional recording sessions (Session B, C…) can be started by launching additional instances of Open Ephys (or use our API), but samples are not synchronized between separate sessions (session A and session B samples and timestamps are not related).
If you have one common source you would like to use across multiple recording sessions (e.g., DigitalPanel channels are used to delineate experimental epochs for both session A and session B), be sure to re-add the same source to every single recording session where it is needed.
Drag an LFP Viewer from the Sinks list and attach it to any eCube Server you want to view directly. Open its viewing window.
In ServerNode, set your recording destination by issuing the command record --path=[desired path]. For example, to save all files into a D: drive under folder data, issue the command
> record --path=D:\data\
You will see a notification that the path has been successfully changed:
> [2020-07-29 18:21:47.458] [hub] [info] Changed new recording dir to 'D:\data\'
(Optional) You can also set an auto-segment time for the files. As eCube files are large (usually ~3MB per 64-channel-seconds), files can be quickly extremely large to handle. As a result, files can be seamlessly segmented into multiple chunks of a set duration. You can change this duration by issuing:
> record --seconds=600
This example will set all upcoming recordings to seamlessly roll over to a new file every 600 seconds (10 minutes).
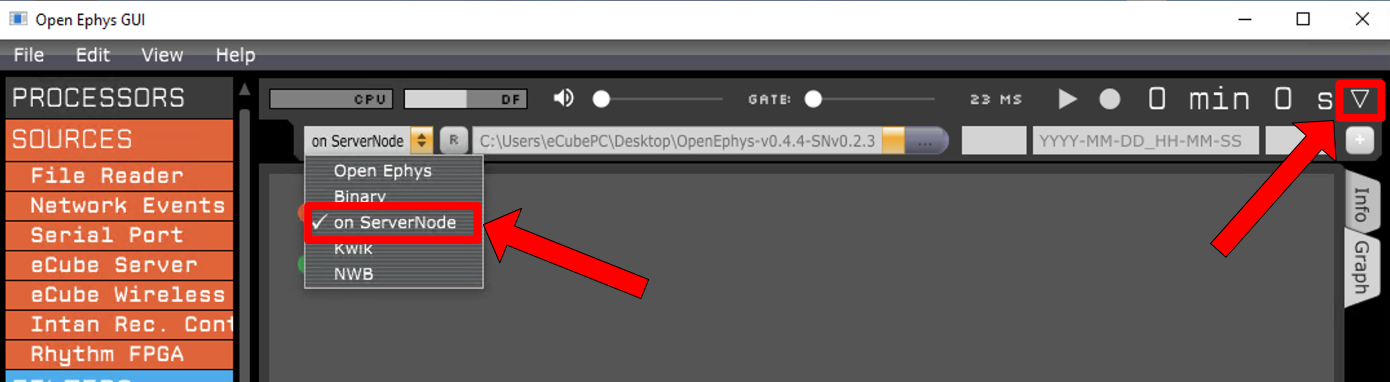
Expand the recording control drawer by clicking the hollow triangle in the top right hand corner.
In the left-hand drop down, select on ServerNode as the recording destination.
Add prefix and postfix to your recording session as needed.
Updating software and firmware for your eCube and ServerNode setup.